
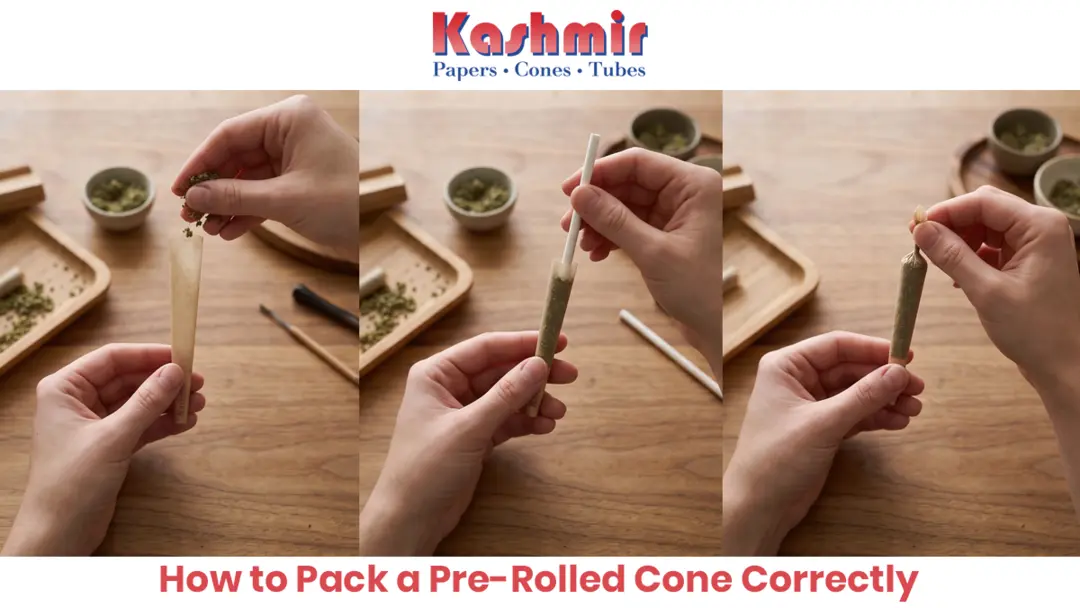
How to Pack a Pre-Rolled Cone Correctly
A pre-rolled cone saves you from having to shape the paper yourself, but filling one well still takes a little technique.
The most common mistake is treating the cone like a container that simply needs to be filled. In reality, the way the material settles inside matters just as much as how much goes in.
If the lower section is packed too firmly, airflow can become restricted. If the fill is too loose or uneven, gaps can form through the cone. The aim is somewhere in the middle: an even pack from the tip upward, without turning the contents into a tightly compressed column.
The easiest way to get there is to work gradually.
Start With the Right Cone Size
Before you fill anything, choose a cone that matches the amount you actually intend to use.
Kashmir currently offers pre-rolled cones in common formats including 1¼ and King Size. Its 1¼ cones are listed at about 78 mm, while King Size options are around 109 mm.
That difference matters because the cone has already been shaped for you.
With a loose rolling paper, you can adjust the final roll as you go. With a cone, the width and length are already fixed, so starting with an oversized cone can leave you trying to fill space you did not really need.
For a smaller amount, a 1¼ cone is generally the more practical format. A King Size cone gives you more room when you actually need the extra capacity.
Prepare the Material Before Filling
Good packing starts before anything goes into the cone, and grinding is the key step here.
Use a grinder to break the material into a reasonably even, medium consistency before filling the cone. The goal is not to turn it into a fine powder. You simply want to break down larger pieces so the material can settle more evenly inside the tapered shape.
Large, uneven pieces can create gaps as you fill, while material that is ground extremely fine can compact too tightly and restrict airflow. A consistent grind makes it easier to distribute the material from the narrow end of the cone upward without needing to correct the pack later.
After grinding, check the consistency before filling. If you still see noticeably large pieces, break them down a little further. At the same time, avoid repeatedly grinding the material until it becomes powdery.
Once the texture looks fairly even, add it to the cone gradually rather than pouring everything in at once.
This small preparation step makes the rest of the packing process much easier. When the material has been ground evenly from the start, it settles more naturally and requires less pressure from the packing tool.
Fill From the Tip Up
Hold the cone upright, with the narrow end and built-in tip at the bottom.
Add a small amount first.
Do not try to fill half the cone in one pour. Let that first bit settle into the narrow section, then give the cone a gentle tap against your palm or work surface.
Once the material has settled, use the packing stick lightly.
Kashmir’s cone product pages follow this same basic method: fill the pre-shaped cone, gently tamp the contents with the packing stick, then close the open end once packing is complete.
The word gently matters here.
You are trying to take out obvious empty space, not compress the bottom into a hard plug.
Build the Cone in Layers
This is the part that makes the biggest difference.
Instead of filling the cone first and packing afterward, alternate between the two.
Add some material, let it settle, tamp it lightly, then repeat.
That gives you much better control over the density from bottom to top.
It also makes problems easier to spot. If one section feels soft, you can correct it while you are still working there instead of discovering it after the cone is already full.
A cone packed this way usually feels more uniform because no single section has had to support the weight of everything poured on top of it at once.
Think of it less as stuffing the cone and more as building the fill gradually.
How Tight Should a Pre-Rolled Cone Be?
This is where people tend to overthink things.
The cone should feel filled and supported, but not hard.
You should not feel large hollow areas through the paper. At the same time, pressing the sides should not feel like pressing against a solid stick.
A little give is normal.
The narrow end deserves extra attention because it has less space available. If that section is packed aggressively, airflow can become restricted before the rest of the cone is even filled.
As the cone gets wider, you can add slightly more material at a time, but the pressure should stay light.
The goal is even density, not maximum density.
Air Pockets: How They Happen
Air pockets usually form when the cone is filled too quickly.
Material can bridge across the wider part of the cone while leaving an open space underneath. From the outside, the cone may look full even though the inside is uneven.
Gentle tapping helps prevent this because it encourages the contents to settle naturally into smaller spaces.
A light tamp afterward can level the layer.
What usually does not help is pushing the packing tool deep into the cone and pressing hard. That can fix one loose section while creating an overly dense one directly below it.
Small adjustments work better.
Avoid Overpacking
It is easy to assume that a tightly packed cone is a better packed cone.
That is not necessarily the case.
Once the contents are compressed too heavily, airflow has less room to move through the cone. Overpacking can also make the narrow section near the tip noticeably denser than the upper part.
If you catch yourself needing force to move the packing stick downward, that is usually a sign to stop pressing.
Let settling do more of the work.
A couple of gentle taps followed by a light tamp is usually more useful than one hard push.
Leave a Little Room at the Top
A cone should not be filled all the way to the edge.
You need some empty paper at the open end so it can be closed without forcing material back out.
Kashmir’s cones are designed to be filled, packed and then twisted at the open end to close them.
There is no need to measure the remaining paper precisely.
Just leave enough to pinch comfortably between your fingers.
Once the cone feels evenly packed, gather the unused paper at the top and give it a light twist.
The closure only needs to hold everything in place. A tight, heavily twisted tail is not necessary.
A Quick Check Before You Finish
Before closing the cone, run your fingers lightly along the outside.
You are checking for three things: sections that feel noticeably soft, areas that feel much harder than the rest, and obvious gaps.
If you find a soft section near the top, add a little material and settle it.
If one area feels very firm, avoid pressing it further.
That simple check takes a few seconds and is often more useful than repeatedly tamping the whole cone.
Common Packing Problems
| Problem | What Usually Causes It | What to Do Instead |
| Soft sections | Filling too quickly | Add material in smaller layers |
| Large gaps | Uneven material or poor settling | Tap the cone gently between fills |
| Very hard bottom | Too much pressure near the tip | Tamp lightly, especially at the narrow end |
| Difficult airflow | Overpacking | Aim for firm but not compressed |
| Material spilling out | Filling too close to the edge | Leave enough paper at the top to close the cone |
| Uneven density | Packing only after the cone is full | Fill and tamp in stages |
Final Tips for Packing a Cone Consistently
If you are learning how to pack a cone correctly, the best approach is not complicated.
Take your time at the beginning. Keep the material fairly even, fill from the narrow end upward, and work in small layers.
Let gravity and gentle tapping settle the contents before reaching for the packing stick.
Use the stick to tidy the fill rather than force it downward.
And once the cone feels consistent from bottom to top, leave a little space and close the end.
Kashmir’s pre-rolled cones already come shaped and are available with built-in tips across several sizes and paper styles, so most of the work has already been done before you start filling.
The part you control is the pack.
Keep that even, and the rest of the process becomes much simpler.